上一篇中,我们对Sphinx/Coreseek进行了简单的介绍,同时我们也愉快的把Sphinx/Coreseek安装进了Linux中,本篇内容中,我们将重点介绍如何对Sphinx/Coreseek进行配置。
本篇中,我们将介绍:
(1)、配置文件的结构
(2)、配置csft.conf(sphinx.conf)
(3)、测试全文索引
一、配置文件的结构
在安装好Sphinx/Coreseek之后,在它的etc目录(这里,我们安装在/usr/local/coreseek/)中我们会看到两个或以上的文件,它们为“sphinx.conf.dist”、“sphinx-min.conf.dist”它们是Sphinx的预设配置文件,它们分别代表标准配置和最简配置,有得版本还会外加一个“example.sql”。

为了降低配置的难度,本文中我们使用“sphinx-min.conf.dist”进行讲解。
我们需要把这个min文件拷贝并重命名为“csft.conf”(注:如果您使用的是Sphinx,则重命名为sphinx.conf)
cp sphinx-min.conf.dist csft.conf
然后我们用vi编辑器打开文件,它的结构如下(我把代码贴出来)
 csft.conf


 1 #
 2 # Minimal Sphinx configuration sample (clean, simple, functional)
 3 #
 4
 5 source src1
 6 {
 7     type                    = mysql
 8
 9     sql_host                = localhost
10     sql_user                = test
11     sql_pass                =
12     sql_db                    = test
13     sql_port                = 3306    # optional, default is 3306
14
15     sql_query                = \
16         SELECT id, group_id, UNIX_TIMESTAMP(date_added) AS date_added, title, content \
17         FROM documents
18
19     sql_attr_uint            = group_id
20     sql_attr_timestamp        = date_added
21
22     sql_query_info            = SELECT * FROM documents WHERE id=$id
23 }
24
25
26 index test1
27 {
28     source                    = src1
29     path                    = /usr/local/coreseek/var/data/test1
30     docinfo                    = extern
31     charset_type            = sbcs
32 }
33
34
35 indexer
36 {
37     mem_limit                = 32M
38 }
39
40
41 searchd
42 {
43     port                    = 9312
44     log                        = /usr/local/coreseek/var/log/searchd.log
45     query_log                = /usr/local/coreseek/var/log/query.log
46     read_timeout            = 5
47     max_children            = 30
48     pid_file                = /usr/local/coreseek/var/log/searchd.pid
49     max_matches                = 1000
50     seamless_rotate            = 1
51     preopen_indexes            = 0
52     unlink_old                = 1
53 }
54
配置文件主要分为几个区间,分别为:
“source”:数据源,用于配置Sphinx/Coreseek生成索引的相关参数。
“index”:索引库,用于配置Sphinx/Coreseek生成索引的策略、存储位置等。
“indexer”:索引器,用于配置Sphinx/Coreseek索引器所拥有的资源。
“Searchd”:Sphinx/Coreseek提供的守护进程,默认监听9312端口。
二、配置csft.conf(sphinx.conf)
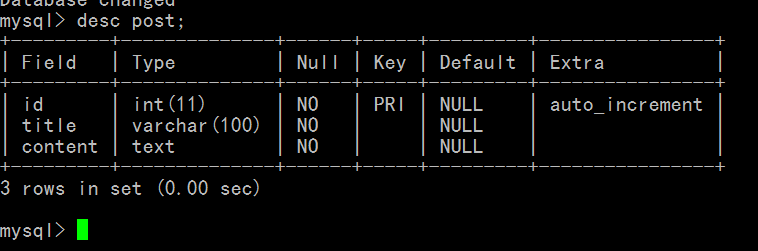
在配置数据之前,我已经事先把Mysql(数据源)已经准备好了,它里面有一个blog的数据库,数据库里面有一张post表并已经填充了一些数据,其表结构如下图所示(读者可以点击这里下载):
好的,我们便开始配置csft.conf,配置比较繁琐,各位读者要小心。我们用vi打开它。
首先我们先配置数据源:
·找到source(第五行)把“scr1”改为“main”【这里是修改数据源的名字】
·然后把source节点里面的“sql_host”至“sql_port”的配置好【配置数据库,很easy】。
·在“sql_query”上面加上这么一句:“sql_query_pre = SET NAMES utf8”【设置字符集】。
·把“sql_query”设置为“select id,title from post”【仅对title做索引】。
·在“sql_attr_uint”和“sql_attr_timestamp”前面加#号注释掉。
·把“sql_query_info”改为“select id,title from post where id=$id”【得到索引后详细查询】。
完成数据源的配置。
接下来开始配置索引库:
·找到index(第二十五行)把“test1”改为“main”【修改索引库名称】。
·把source改为“main”【设置数据源】。
·把path改为“/usr/local/coreseek/var/data/main”【修改存储路径】。
·在“docinfo”后加入这一行:“charset_dictpath = /usr/local/mmseg3/etc/”。
·把“charset_typoe”改为“zh_cn.utf-8”。
·最后在“charset_type”后面加入这一行“ ngram_len = 0”。
好的,索引库已经配置好,剩下的我们就暂且不需要配置。
配置完成后的代码如下所示:
配置好的csft.conf
 1 #
 2 # Minimal Sphinx configuration sample (clean, simple, functional)
 3 #
 4
 5 source main
 6 {
 7     type                    = mysql
 8
 9     sql_host                = localhost
10     sql_user                = root
11     sql_pass                = root
12     sql_db                    = blog
13     sql_port                = 3306    # optional, default is 3306
14
15     sql_query_pre                = SET NAMES utf8
16     sql_query                = select id,title from post
17
18 #    sql_attr_uint            = group_id
19 #    sql_attr_timestamp        = date_added
20
21     sql_query_info            = select id,title from post where id=$id
22 }
23
24
25 index main
26 {
27     source                    = main
28     path                    = /usr/local/coreseek/var/data/main
29     docinfo                    = extern
30     charset_dictpath        = /usr/local/mmseg3/etc/
31     charset_type            = zh_cn.utf-8
32     ngram_len                    = 0
33 }
34
35
36 indexer
37 {
38     mem_limit                = 32M
39 }
40
41
42 searchd
43 {
44     port                    = 9312
45     log                        = /usr/local/coreseek/var/log/searchd.log
46     query_log                = /usr/local/coreseek/var/log/query.log
47     read_timeout            = 5
48     max_children            = 30
49     pid_file                = /usr/local/coreseek/var/log/searchd.pid
50     max_matches                = 1000
51     seamless_rotate            = 1
52     preopen_indexes            = 0
53     unlink_old                = 1
54 }
55
这就是配置过程,整个的过程比较繁琐,各位读者请小心配置,不过这是值得的,因为它将会带来巨大的回报。
三、测试全文索引
配置完成之后,我们迫不及待的进行我们的测试。Sphinx/Coreseek的可执行文件位于bin中,我们进入bin目录。
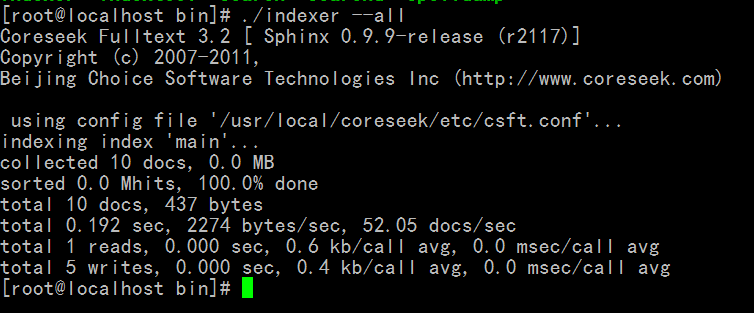
我们需要生成一下索引,执行“./indexer --all”生成一次索引。
然后我们试着搜索一些词,具体使用方法是:“./search '搜索的语句'”。
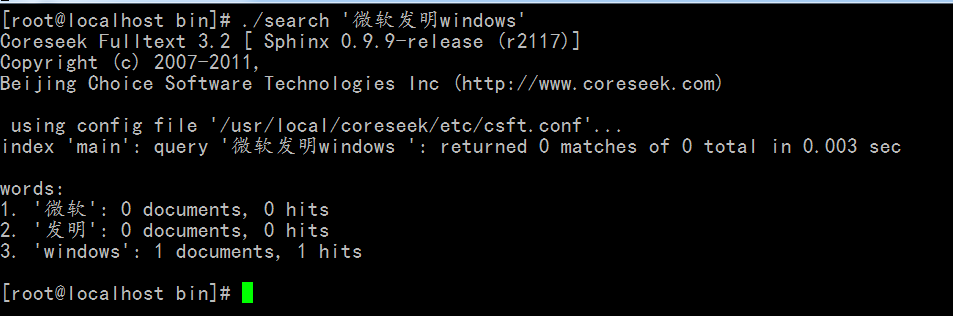
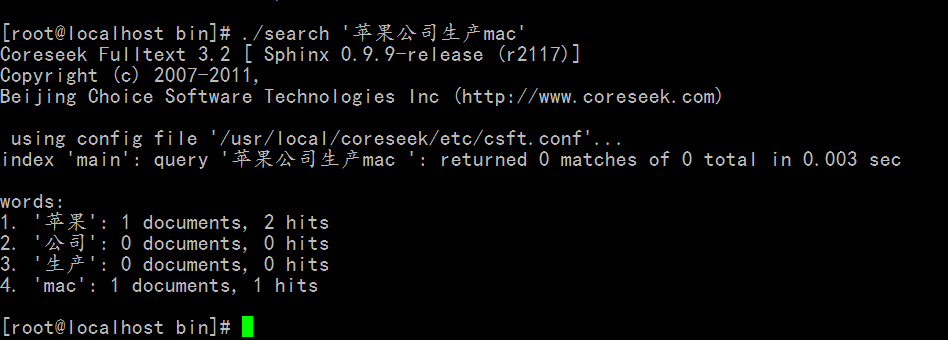
图中已经显示分词情况,以及命中情况,可以看出,效果还是不错的。
好的,本节内容暂时就先讲这么多,下一篇中,我们将讲解更多关于Sphinx/Coreseek的使用,我们下回见。
